Running hashcat on a VM does not offer the GPU processing advantage of running on bare metal. For a system running Kali (or other distros) on VMWare this means capturing hashes locally and moving them to a second system running hashcat on a bare metal install. While this is not difficult to do, for efficiency it’s better to have a system in place to streamline this effort. The goal of this project was to build a multi-user system that’s scalable, secure, and easy to use, that does not break the budget. After some research and thought about how to build this it was clear that hashtopolis could do the heavy lifting and offered the scalability, security, and easy of use that was needed.
The Rig
What do you do with an old Dell Studio XPS 9100 tower that’s been sitting around collecting dust for half of it’s 15 year old life? With it’s meager 8GB of RAM and fading Intel Core i7-920@2.67 GHz processor the system long since gave up on running Windows 7 and it really wasn’t great at that in it’s heyday. Build a “cheap” cracking rig of course! Estimated value, $150.
Upgrading the Rig
First step was to upgrade the old Dell XPS system to handle the power demands of our choice of GPU, a Gigabyte GEFORCE RTX 4090.

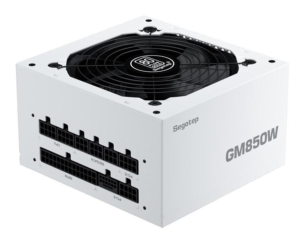
We picked up the GPU for a little over $1700 from newegg.com. With power demands of this GPU being over 450W the stock PSU in the old Dell was not going to cut it. For another $99 we picked up a Segotep GM850W power supply, also from newegg.
Total cost for our rig, just under $2000.
After a week the parts arrived and building could begin. The PSU fit the case perfectly. We were happy to see that nothing has changed in 15 years in this department. The Segotep PSU came with everything that was needed to connect to the existing CD-ROM and SATA drives in the tower and to the 4090 GPU. This was also a nice break for us as we weren’t sure what cables would come with the unit and if we needed anything in addition to make our connections.
The Gigbyte GEFORCE RTX 4090 is big! With only one PCI Express slot on the motherboard and near the bottom there wasn’t much choice for where to mount the card. We had to remove a fan at the front of the
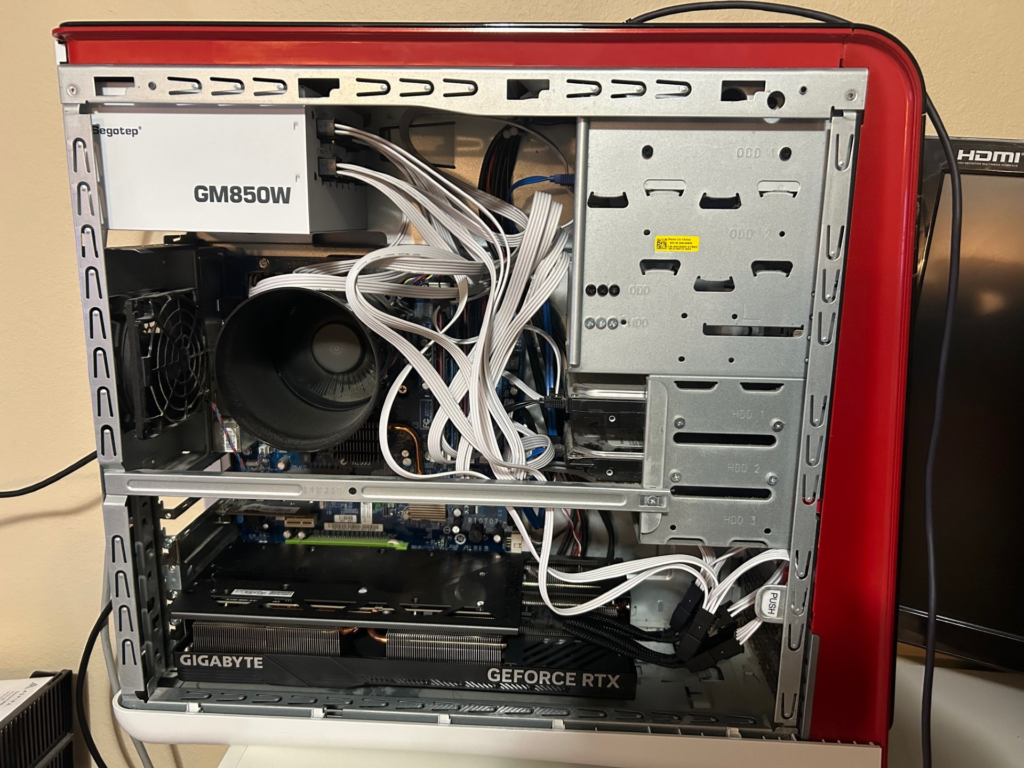
tower to make the card fit. There isn’t much room between the GPU fans and the bottom of the case but there is some clearance and room for air to flow and the heat is directed away from any critical parts. That said we’ve so far opted to run this rig with the side of the case off until we are convinced that overheating will not be an issue. The 4090 does heat up but the fans do a good job of cooling the unit down and surprisingly they are pretty quiet. In fact the processor fan is louder then the three GPU fans when they are both running at 100%.
Installing NVIDIA Drivers
After the hardware rebuild the system got a fresh install of Kali Linux 2023.3. In our case Kali did not fully recognize the GPU when the system came back up from the install so we only had a command line interface to install the NVIDIA drivers – so don’t panic if the Kali GUI does not come up for you initially. Installation of the NVIDIA drivers on Kali is covered very well at this page from kali.org.
First update the system to prepare for the driver install:
$ sudo apt update
$ sudo apt -y full-upgrade -y
$ sudo reboot -f
Confirm the system is recognizing the GPU and see what kernel drivers are in use:
┌──(kali㉿XPS-1)-[~]
└─$ lspci | grep -i vga
09:00.0 VGA compatible controller: NVIDIA Corporation AD102 [GeForce RTX 4090] (rev a1)

┌──(kali㉿XPS-1)-[~]
└─$ lspci -s 09:00.0 -v
09:00.0 VGA compatible controller: NVIDIA Corporation AD102 [GeForce RTX 4090] (rev a1) (prog-if 00 [VGA controller])
        Subsystem: Gigabyte Technology Co., Ltd AD102 [GeForce RTX 4090]
        Flags: bus master, fast devsel, latency 0, IRQ 32
        Memory at fa000000 (32-bit, non-prefetchable) [size=16M]
        Memory at d0000000 (64-bit, prefetchable) [size=256M]
        Memory at ce000000 (64-bit, prefetchable) [size=32M]
        I/O ports at ec00 [size=128]
        Expansion ROM at 000c0000 [virtual] [disabled] [size=128K]
        Capabilities: <access denied>
        Kernel driver in use: nouveau
        Kernel modules: nouveau
Next install the close-source drivers and CUDA toolkit so hashtopolis can take advantage of the GPU:
$ sudo apt install -y nvidia-driver nvidia-cuda-toolkit
$ sudo reboot -f
Benchmarking the System
Once the driver install is complete and the system comes back up from reboot it’s time to run some benchmarks. We compared our system to the benchmark values from Chick3nman and found that it performed pretty well.
$ hashcat -b | uniq| Hash-Mode | Speed |
|---|---|
| 0 (MD5) | 149.4 GH/s |
| 1000 (SHA1) | 252.6 GH/s |
| 22000 (WPA) | 2436.2 kH/s |
Installing and Configuring the Hashtopolis Server
Installation of hashtopolis using a docker container was pretty easy and is covered well in an article from Nikita Guliaev. This article is not going to walk through every step but if you’ve gotten this far you wont have any problems from this point forward.
The first step is to update Kali, install docker-compose, and clone the repo. Configuration of the hashtopolis server is through the .env file. An example.env file that’s included can be copied to a new file named .env and used as is or customized if necessary for your installation.
$ sudo apt update
$ sudo apt install docker-compose
$ sudo git clone https://github.com/hashtopolis/server && cd server
$ sudo cp env.example .env
The next step is to bring up the Docker container so it can build itself out. The first time this is done docker-compose will download and configure everything hashtopolis needs and start the hashtopolis server.
$ sudo docker-compose up -dOnce this is complete you can navigate to the hashtopolis admin page at http://localhost:8080 and login with the default credentials: admin/hashtopolis. The server is pretty much ready to go at this point. To get you started there are couple basic steps and tips below. If you get stuck there is a discord channel that can answer any questions you have.
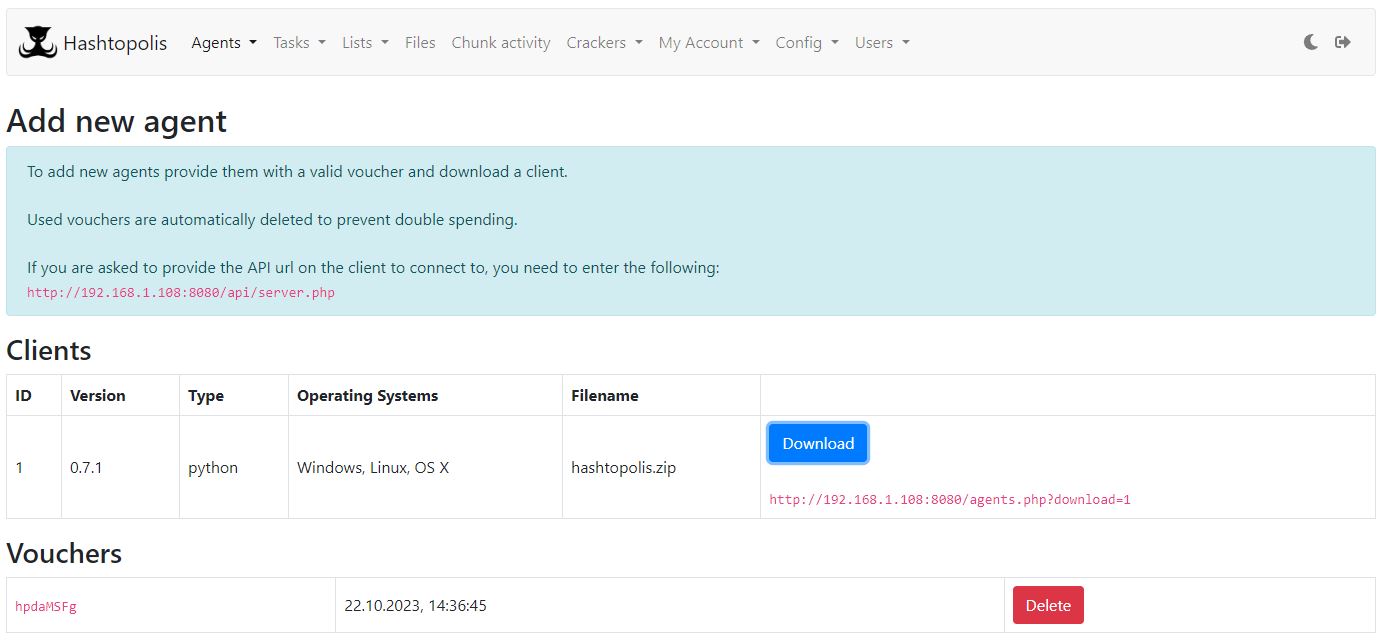
To connect the first client a voucher will need to be setup. Navigate to Agents -> New Agent and click Create. Make note of the voucher ID.
Tip: to make management of vouchers used by clients easier navigate to Config -> Server -> Server tab and check “Vouchers can be used multiple times and will not be deleted automatically”.
Hashtopolis acts as a file server to distribute wordlists, rules, and hashes to the connected Hashtopolis client for processing. Files can be added to the server through web upload, import, or direct upload. The direct upload is picky about the size of the file so anything other than small wordlists or rules should be added using web upload or import. For import, files copied to the import directory will appear in the Files tab in the Add New Wordlists column at the right of the page. You can select the files to upload from here.
Tip: create a link to the hashtopolis import directory to make it easier to copy files to the import folder:
$ ln -s /var/lib/docker/volumes/server_hashtopolis/_data/import /opt/hashtopolis/server/importConfiguring the Hashtopolis Client
The “Agent” in hashtopolis is the machine doing work for the server. The Agent runs the hashtopolis client. The scalability part of hashtopolis discussed earlier is the ability to have multiple agents connected to the server to share processing on a single task. Having multiple agents also works well in a multi-user environment as an unassigned agent can be used for each user’s task. Cracking rigs with multiple high power GPU’s are more difficult and expensive to build than a single GPU configuration. Hashtopolis offers the flexibility/scalability to bring single high power GPU rigs on board as needed providing multiple GPU processing power for large tasks and at the same time flexibility to assign one GPU with one individual task.
To get the agent up and running open a browser and navigate to the hashtopolis server. If you are using the default credentials and running the client on the same machine as the server this will be http://localhost:8080 with credentials admin/hashtopolis.
Navigate to the Agents -> New Agents page and click the Download button. Copy the voucher id on this page.
Create a directory on your client machine and copy the hashtopolis.zip file that was downloaded, to the new directory.
To launch the client run the following command from the terminal:
$ python3 hashtopolis.zip --url http://localhost:8080/api/server.php --voucher [voucher id]In the hashtopolis server web interface navigate to Agents -> Show Agents and confirm your agent is listening.
If you’ve gotten this far you are ready to crack your first hash!
- Create a new hashlist
- Create a new Task
- Assign the Task to your Agent
Happy cracking!